

A flare screen is an off-ball screen where a teammate sets a block behind the cutter’s defender, sending the cutter away from the ball toward the wing or corner for a catch-and-shoot or drive. As MasterClass explains, the screen typically originates near the top of the key or elbow, forcing the defender to navigate around a stationary body. Offensively, the play creates perimeter space and open looks. Defensively, it demands an immediate communication choice: go under, fight over, switch, or hedge.
Key Takeaways
A flare screen creates perimeter separation through an off-ball screen at the elbow or top of the key, and defending it requires an early communication call and a committed team tactic.
| Point | Details |
|---|---|
| Core definition | A flare screen is an off-ball screen that sends the cutter to the wing or corner for a catch-and-shoot or drive. |
| Execution priority | The screener must be stationary at contact; the cutter sets up the defender first before flaring wide. |
| Defensive choice | Go under, fight over, switch, or hedge; commit early and call it before the cutter moves. |
| Legal screen rule | Per NFHS, the screener must be stationary at contact with a shoulder-width stance and arms at the sides. |
| Hoop Mentality tools | The Basketball Starter Pack For Coaches includes practice plan templates and play diagrams for implementing flare screen drills immediately. |
Table of Contents
- What is a flare screen and how does it work?
- How do you execute a flare screen step by step?
- Common flare screen variations coaches use
- How do you defend a flare screen?
- What makes a screen illegal, and what mistakes should you fix?
- Practice drills that build a sound flare screen
- How to spot a flare screen before it happens
- How offenses counter common flare screen defenses
- Coaching points for timing and communication among the trio
- Video breakdowns of flare screens in professional games
- The flare screen is more useful than most coaches realize
- Hoop Mentality resources for coaches teaching the flare screen
- Sources
- FAQ
What is a flare screen and how does it work?
A flare screen is an off-ball screen set away from the ball. Three players drive the action: the screener, the cutter, and the ball-handler.
The screener positions at the elbow or top of the key, plants between the cutter’s defender and the cutter’s intended path, and holds a stationary, shoulder-width stance. The cutter starts closer to the ball or the paint, reads the screen, and arcs outward toward the wing or corner. The ball-handler holds the ball on the strong side or at the top, reads the cutter’s separation, and delivers a skip pass or direct pass for a shot or secondary read.
Common starting spots for the screener are the elbow, the top of the key, and the high post. The cutter typically lands at the wing, the corner, or just above the arc. The angle of the screen is what makes the flare distinct from a curl or a back screen: the screener’s body faces the paint, forcing the defender to go around the outside rather than chase through the lane. That wide arc is exactly what Hoop Student describes as the defining sequence: screener sets, cutter arcs to the perimeter, ball-handler delivers for a catch-and-shoot.
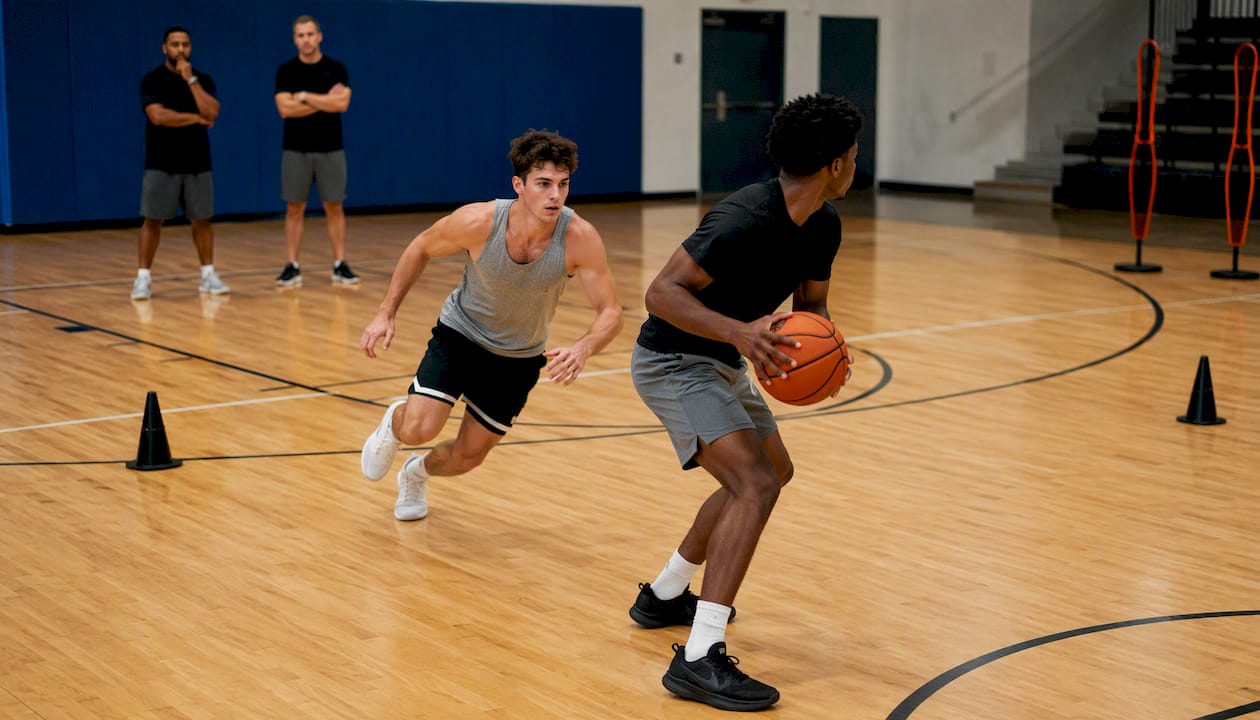
Spacing is the engine. When the screener occupies the elbow and the cutter flares to the corner, two help defenders must choose between rotating to the cutter or staying home. That split-second hesitation is the play’s real value.
How do you execute a flare screen step by step?
Screener steps
- Read the ball-handler’s signal or the play call.
- Walk toward the cutter’s defender from the paint or elbow side.
- Plant both feet at shoulder width, knees slightly bent, arms crossed or at your sides.
- Hold the position until contact is made or the cutter clears.
- After the cutter leaves, roll to the basket, pop to the arc, or clear to the weak side depending on the play design.
Coaching cues for the screener: “Get there early.” “Feet planted before contact.” “Chin up, see the floor after you set.”
Cutter steps
- Set up the defender first: take one or two steps toward the ball or the paint before cutting.
- Read the screener’s plant, then change direction sharply and arc wide.
- Land in a balanced, two-foot catch-and-shoot stance at the wing or corner.
- If the defender goes under the screen, stop and shoot. If the defender fights over, consider the backdoor.
Coaching cues for the cutter: “Sell the drive, then flare.” “Catch ready to shoot.” “Two feet, square up.”
Passer steps
- Watch the cutter’s path and the defender’s choice.
- Time the pass to arrive as the cutter’s feet land, not before.
- Deliver a skip pass with pace and accuracy to the shooting pocket, chest-high.
Coaching cues for the passer: “Pass to where they’re going, not where they are.” “Skip with pace.” “Don’t hold it.”
Pro Tip: The screener’s shoulder angle is the most overlooked detail. Turn your lead shoulder toward the paint as you plant. This widens the screen’s surface area and makes it harder for the defender to squeeze through, giving the cutter a cleaner flare path and reducing the risk of an offensive foul.
As Basketball Army notes, the screener must be ready to move after the screen to create secondary actions like a slip, roll, or pop. That follow-through is what separates a one-read play from a two-read play.
Common flare screen variations coaches use
NBA teams use flares to generate three-point opportunities and weak-side deception across multiple set types. Here are four variations worth installing.
5-Out Flare. All five players start on the perimeter. The screener cuts from the wing to the elbow and sets a flare for a corner shooter. The spacing is maximum, and the help defense has nowhere to hide. Works best with shooting-heavy rosters.
Horns Flare. Two players start at the elbows. One acts as the screener, setting a flare for a wing cutter while the other elbow player holds as a secondary option. The Hoop Mentality Euroleague Horns Flare playbook maps out ten options from this set, showing how small adjustments change the read entirely.
Late-Game Flare. Run from a sideline or baseline out-of-bounds set. The screener sets the flare for your best shooter coming off the corner. Timing is compressed, so the cutter must read the screen faster. Used when you need a three-pointer in under ten seconds.
Flare Slip. The screener fakes the screen and slips to the basket before the defender can react. Effective against teams that switch aggressively. The slip punishes early switching and keeps defenses honest.
Backdoor Counter. When the defender cheats over the screen early, the cutter reverses direction and cuts backdoor. The ball-handler must read this and deliver a lob or bounce pass to the paint.
Defenses disguise their reads by watching the screener’s path. Offenses counter this by using weak-side actions, staggered screens, or a dribble handoff before the flare to shift defensive attention before the screen is set.
How do you defend a flare screen?
Defending the flare comes down to four options. Each fits a different personnel matchup or game situation.
- Go under: The defender trails the cutter under the screen. Use this against poor shooters. Gives up the catch but takes away the shot. Risk: the cutter catches and drives.
- Fight over: The defender pushes through the screen on top. Use against elite shooters. Keeps the defender between the cutter and the ball. Risk: the screener can set a harder angle and the defender gets caught.
- Switch: Both defenders exchange assignments at the moment of the screen. Use when personnel matchups allow it. Eliminates separation but can create a size mismatch. Risk: the screener slips or pops to exploit the switch.
- Hedge/show and recover: The screener’s defender steps out to slow the cutter while the cutter’s defender fights to recover. Use against quick cutters who can shoot off the catch. Risk: the screener rolls or pops if the hedge is too aggressive.
| Situation | Recommended defense | Key risk |
|---|---|---|
| Cutter is a poor shooter | Go under | Cutter drives on catch |
| Cutter is an elite shooter | Fight over | Defender gets screened hard |
| Switching personnel available | Switch | Screener slips or pops |
| Quick cutter, recovery possible | Hedge and recover | Screener exploits the hedge |
Communication is the most important defensive variable. The screener’s defender must call “Screen!” early, and both players must agree on the tactic before the cutter moves. An early “Switch!” or “Show!” call gives both defenders time to execute. For more on defensive communication protocols, the principles apply directly to flare situations.
Coaching cue: “Defense is five, not one. Call it early, commit together.”
What makes a screen illegal, and what mistakes should you fix?
A legal screen requires the screener to be stationary at the moment of contact, give the defender a reasonable chance to avoid contact, and keep arms at the sides or crossed at the chest. Moving into the defender, extending an elbow, or leaning into the path of the defender results in an offensive foul. Per NFHS rules, coaches must teach a set, shoulder-width stance with knees slightly bent before any contact occurs.
Common mistakes that lead to offensive fouls:
- Moving into the defender: The screener takes a final step toward the defender at contact instead of planting first.
- Extending arms or elbows: Arms out widen the screen illegally and create contact.
- Setting too high or too low: A screen set at shoulder height or below the waist changes the contact point and draws calls.
- Leaning on contact: The screener shifts weight into the defender after planting.
Drills to fix these errors: use a stationary pad holder as the “defender” and have the screener plant and hold for three seconds before the cutter moves. Add a coach calling “legal” or “foul” based on stance. Repeat until the plant is automatic. As Rockstar Academy outlines, the skip pass to the shooter works only when the screen is set cleanly behind the defender.
Practice drills that build a sound flare screen
- Drill 1: Partner plant reps. Two players, no ball. Screener walks to the elbow, plants, holds for three seconds while the cutter arcs to the wing. Focus: shoulder angle, feet width, no lean. Goal: 10 clean plants in a row with no movement on contact.
- Drill 2: 3-player catch-and-shoot. Add a passer at the top. Run the full sequence: screener plants, cutter flares, passer skips. Cutter shoots off the catch. Focus: pass timing and catch-and-shoot balance. Goal: 8 out of 10 makes from the wing and corner.
- Drill 3: 5-on-0 walk-through. Full five players, no defense. Walk through the 5-out flare and horns flare at half speed, then full speed. Add a coach calling defensive reads so players practice decision-making. Goal: fewer than two timing errors per 10 reps.
- Drill 4: 5-on-5 controlled scrimmage. Live defense, but the offense calls the flare play before each possession. Defense practices calling the tactic. Offense practices reading the defensive choice. Goal: fewer than two turnovers per 20 possessions.
Hoop Mentality’s Basketball Starter Pack For Coaches includes practice plan templates and play diagrams that slot these progressions directly into your weekly schedule. The Big Man Dual Action Drill pairs well with Drill 1, building screener decision-making and secondary actions after the screen is set.
How to spot a flare screen before it happens
Recognizing a flare screen in live play is a skill that takes deliberate practice. Here are the telltale signs:
- The screener moves away from the ball, not toward it. Most screens are set toward the ball side. A player drifting to the elbow or high post on the weak side is a flare signal.
- The cutter takes a step toward the paint first. That setup move is the cutter selling a drive before reversing to the perimeter.
- The ball-handler holds the dribble or slows down. They are waiting for the cutter to clear the screen before delivering the skip pass.
- The weak side clears out. If the corner and wing on the ball side are empty, the offense is creating a landing spot for the flare.
For defenders, the timing cue is the screener’s first step away from the ball. That is the moment to call the screen and commit to a tactic. Waiting until the cutter is already moving is too late.
How offenses counter common flare screen defenses
Defenses that defend the flare well force offenses to adjust. Here is how offenses respond to each defensive tactic:
When the defense goes under the screen consistently, the cutter stops at the screen and shoots over the top. The screener can also set a tighter angle to slow the defender further.
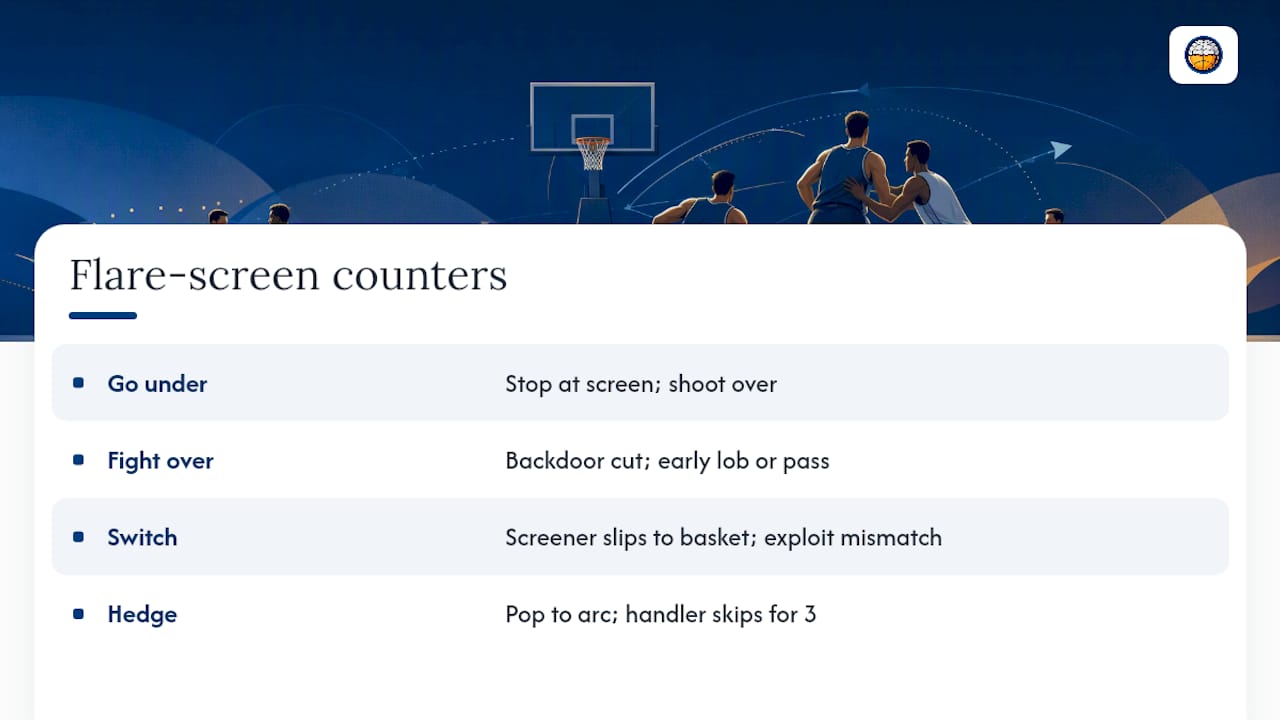
When the defense fights over, the cutter uses the backdoor. The ball-handler must read this early and deliver a lob or bounce pass before the defense recovers.
When the defense switches, the screener slips before the switch is complete. A slip to the basket against a smaller switched defender creates a mismatch at the rim. The Attacking The Hedge Ball Screen Defense resource covers these counters in detail.
When the defense hedges, the screener pops to the arc immediately after the hedge. The ball-handler skips to the screener for an open three-pointer while the hedging defender is out of position.
Offenses also use staggered screens before the flare to tire defenders and shift their positioning before the main action begins.
Coaching points for timing and communication among the trio
The flare screen fails most often because of timing breakdowns, not technique. Three coaching points fix the majority of errors.
The cutter sets up the defender first. If the cutter flares immediately without a setup move, the defender reads the screen and recovers. One or two steps toward the paint before the flare gives the screener time to plant and gives the defender a false read.
The screener communicates with the cutter. A quick verbal cue or eye contact before the screen tells the cutter the screener is set. Without this, cutters often flare before the screen is planted, wasting the action.
The passer reads the defender, not the cutter. The pass timing is determined by where the defender is, not where the cutter is. If the defender is trailing, the pass goes to the catch spot. If the defender is fighting over, the passer holds and looks for the backdoor or the screener’s secondary action.
For deeper work on communication strategies that apply to screen execution and defensive calls, the principles transfer directly to flare situations.
Video breakdowns of flare screens in professional games
Watching the flare at the NBA level shows details that diagrams alone cannot convey. The
is a short, clear demonstration of cutter angle and pass timing, suitable for showing in a film session before practice.
NBC Sports published a video breakdown of NBA flare screen usage featuring Stephen Curry and the Golden State Warriors alongside CJ McCollum and the Portland Trail Blazers. Both examples show how the elbow screen forces the defender into a split-second choice and how the ball-handler reads that choice to deliver the pass. Curry’s version is particularly instructive: his setup move before the flare is subtle but deliberate, and the pass arrives exactly as his feet land.
For film sessions, pair the YouTube clip with a whiteboard walkthrough of the 5-out or horns flare. Show the clip first, pause at the screener’s plant, then draw the action. Players retain the visual and the diagram together far better than either alone.
The flare screen is more useful than most coaches realize
Most coaches introduce the flare screen as a set play for a specific shooter. That is the right starting point, but it undersells the play’s range. The flare works in 5-out spacing, horns sets, late-game situations, and as a counter to aggressive switching defenses. It is one of the few off-ball actions that simultaneously creates a perimeter shot, a backdoor cut, and a screener slip, all from the same initial movement.
The mistake coaches make is teaching the flare as a one-read play. Players learn to flare, catch, and shoot. When the defense takes that away, the play dies. The real value is in the second and third reads: the backdoor when the defender cheats, the screener’s pop when the defense hedges, the slip when the switch comes early. Teaching those reads in practice, not just the primary action, is what makes the flare a reliable weapon rather than a predictable set.
Introduce the flare after your team has foundational spacing work in place. Players who understand where to be on the floor learn the flare faster because the positioning is already familiar. The technique comes second; the spacing comes first.
Hoop Mentality resources for coaches teaching the flare screen
Coaches who want ready-made tools to teach the flare screen faster will find everything they need at Hoop Mentality.
The Basketball Starter Pack For Coaches includes practice plan templates and play diagrams built for immediate use. Drop the flare screen progression directly into your weekly schedule without building from scratch. The Basketball Template Bundle For Coaches gives you editable planning templates for play diagrams and practice progressions. The Basketball Shooting Bundle For Coaches pairs with catch-and-shoot flare work, with shooting rep tracking built in. For scouting, the Editable Scouting Report Template and Basketball Scouting Report Template let you document how opponents run and defend flares before game day. Browse the full collection at Hoop Mentality and pick the tools that fit your next practice.
Sources
- NFHS
- Flare Screen: Key Steps to Executing the Basketball Screen - MasterClass
- Flare Screen in Basketball: Concepts and Examples - Hoop Student
- How To Set A Screen In Basketball: Master It - Basketball Army
- Basketball Screen: Rules, Techniques, and Counter Effectively - Rockstar Academy
FAQ
What is a flare screen in basketball?
A flare screen is an off-ball screen set near the elbow or top of the key that sends a cutter away from the ball toward the wing or corner for a catch-and-shoot or drive. The screener plants between the cutter’s defender and the cutter’s path, forcing the defender to navigate around the screen.
Why are moving screens illegal?
A moving screen is illegal because the screener fails to be stationary at the moment of contact, removing the defender’s reasonable chance to avoid the screen. Per NFHS rules, the screener must plant in a shoulder-width, balanced stance before any contact occurs; moving into the defender results in an offensive foul.
How do you defend a flare screen effectively?
The four main options are go under, fight over, switch, and hedge and recover. The choice depends on the cutter’s shooting ability and personnel matchups, but the most important factor is an early verbal call so both defenders commit to the same tactic before the cutter moves.
What is the difference between a flare screen and a back screen?
A flare screen sends the cutter away from the ball toward the perimeter; a back screen sends the cutter toward the basket. Both are off-ball screens, but the direction of the cut and the resulting shot type differ. For a broader look at types of basketball screens, the distinctions between flare, back, curl, and fade screens are covered in detail.
When should a coach introduce the flare screen?
Introduce the flare after players have foundational spacing and off-ball movement in place. Players who already understand floor spacing learn the flare faster because the positioning is familiar before the screen technique is added.