
TL;DR:
- Teaching shooting form with a structured focus on the B.E.E.F. model ensures players develop consistent mechanics before adding distance or complexity. Coaches should prioritize close-range drills, monitor follow-through, and build confidence through repetitive, focused practice to produce reliable shooters. Progress should be tracked via video and specific mechanical metrics, emphasizing patience and simplicity over complexity and volume.
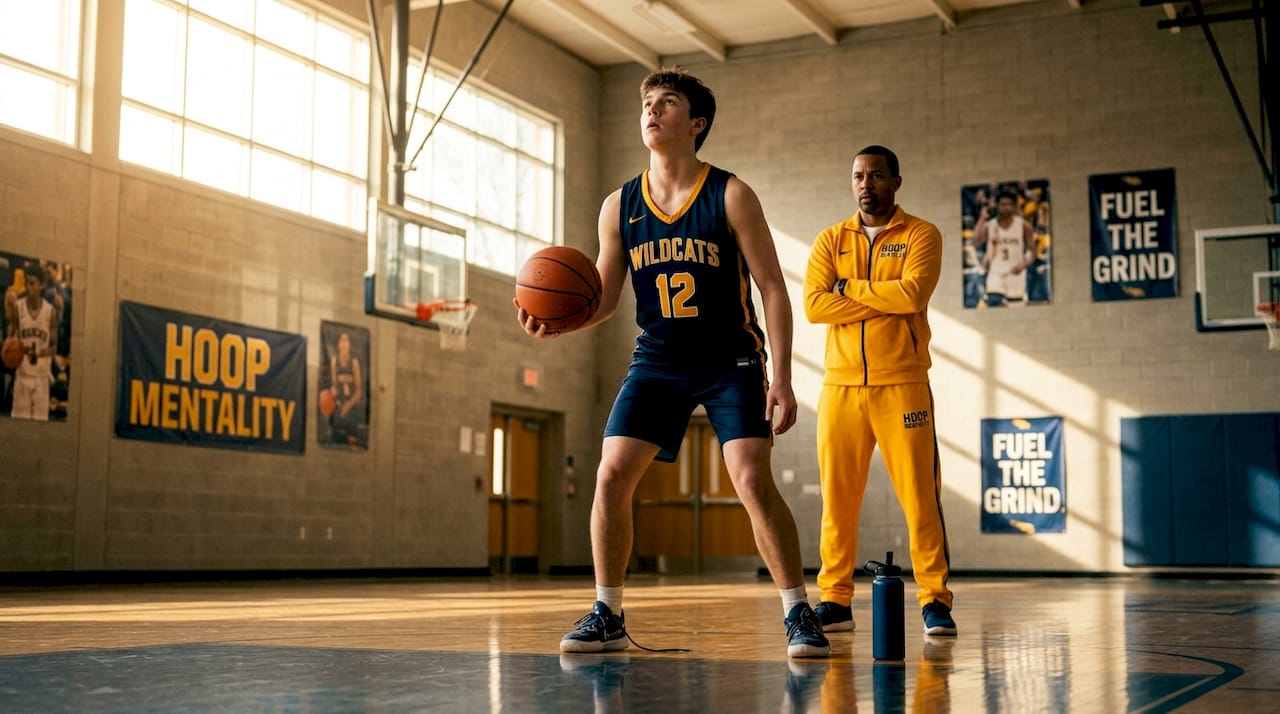
Knowing how to teach shooting form separates coaches who produce confident scorers from those who watch players develop bad habits that take years to fix. Players at every level struggle with inconsistent mechanics, and the problem rarely fixes itself through repetition alone. Without a structured teaching approach, you get more of the same. This guide walks you through the foundational knowledge, drill progressions, diagnostic tools, and habit-building techniques you need to develop shooters systematically. Whether you are working with youth beginners or experienced high school athletes, the framework here applies.
Table of Contents
- Key takeaways
- What coaches need before teaching shooting form
- Step-by-step progression for teaching shooting form
- Common shooting form mistakes to watch for
- Building habits and player confidence
- Measuring and verifying shooting form progress
- My honest take on teaching shooting form
- Resources to support your shooting practice
- FAQ
Key takeaways
| Point | Details |
|---|---|
| Start with form, not range | Build muscle memory at close range before adding distance or competition. |
| Use B.E.E.F. as your anchor | The Balance, Eyes, Elbow, Follow-through model gives players a consistent self-check tool. |
| Progress one variable at a time | Add footwork, distance, and movement only after each layer of mechanics is solid. |
| Diagnose with follow-through | Holding the follow-through after every rep reveals incomplete mechanics immediately. |
| Short, quality sessions beat volume | Focused repetition prevents rushing and reinforces proper habits faster than high-volume grinding. |
What coaches need before teaching shooting form
Before you run a single drill, you need the right foundation. That means understanding the core model, having the right setup, and knowing what environment produces the best results.
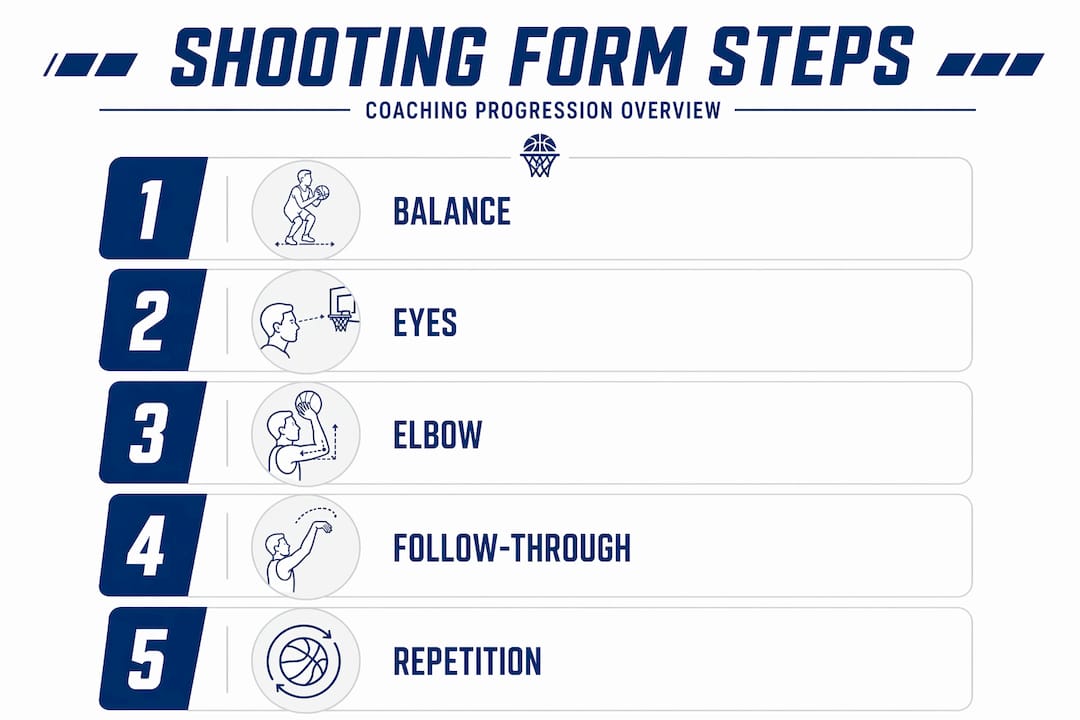
The B.E.E.F. model explained
The B.E.E.F. coaching model breaks shooting mechanics into four teachable checkpoints: Balance, Eyes, Elbow, Follow-through. It works because it gives players something concrete to self-monitor rather than trying to process every mechanical detail at once. Acronyms like this reduce complex skills into repeatable cues players can internalize over time.
Balance starts with a stable base. Feet shoulder-width apart, slight bend in the knees, weight centered. Eyes land on the front of the rim before the shot goes up and stay there through the release. Elbow tucks under the ball, forming a direct line up through the wrist. Follow-through holds the wrist snapped down, fingers pointing at the target. Every correction you make traces back to one of these four points.
Equipment and environment setup
You do not need much to get started. A basketball, a marked target on the backboard or rim tape, and a few cones for positioning are sufficient for most form drills. What matters more is proximity. Working close to the basket, at 2 to 3 feet, removes the temptation to muscle the ball and lets players focus purely on mechanics.
Here is what your setup checklist should include:
- Regulation basketball (or smaller ball for younger players)
- Marked target on the backboard at eye level
- Cones placed at key spots on the floor for consistent positioning
- Wall or chair for seated form shooting with beginners
- A phone or tablet for video recording
Pro Tip: Set up your camera at an angle that shows both elbow alignment and follow-through from the side. This single view catches most of the common mechanical errors before you even speak to the player.
Close-range form shooting vs. game-speed practice
| Approach | Best for | Key benefit |
|---|---|---|
| Close-range form shooting | Early mechanics, beginners | Isolates technique without distance pressure |
| Mid-range repetition drills | Intermediate players with solid base | Grooves footwork and catch-and-shoot patterns |
| Game-speed practice | Advanced players, pre-competition | Tests mechanics under fatigue and movement |
Start at the bottom of this table. Move up only when the mechanics at each level are consistent.
Step-by-step progression for teaching shooting form
The isolate, groove, test workflow is the most reliable framework for building shooting mechanics across all skill levels. Here is how to apply it in practice.
-
Isolate the shooting hand. Begin with one-hand form shooting at 2 to 3 feet from the basket. Players use only their shooting hand, focusing on elbow tuck and wrist snap. This builds muscle memory before range or a guide hand are introduced.
-
Groove B.E.E.F. through repetition. Add the guide hand and run 10 to 15 repetitions from close range with full attention on each B.E.E.F. checkpoint. No game pressure. No rushing. Call out each cue as players shoot and have them hold the follow-through after every release.
-
Introduce catch-and-shoot footwork. Once the release looks consistent, add a simple catch from a partner or coach and a one-two step into the shot. Focus on proper footwork fundamentals before worrying about where on the floor the player is shooting from.
-
Add distance in small increments. Move from 5 feet to 10 feet to 15 feet only after mechanics hold up at the previous distance. Pushing distance before readiness creates bad habits that are harder to fix than if you had never added range at all.
-
Introduce movement and shot fakes. Ladder shooting drills, where players move from spot to spot after each make, add light movement complexity. Shot-fake drills add a decision step. These test whether the mechanics survive real-game pressure.
-
Test form under fatigue. Run a conditioning segment, then shoot. Fatigue is when form breaks down fastest, and training through it prepares players to maintain mechanics in the fourth quarter.
Pro Tip: Keep reps short and focused rather than grinding volume. Youth shooting drills produce better results with 10 quality repetitions than 50 rushed ones. Tired players develop bad habits, not better mechanics.
Common shooting form mistakes to watch for
Even players who can describe correct form will break down under fatigue or game pressure. Your job as a coach is to catch the drift before it becomes a habit.
Here are the most common errors to watch for:
- Elbow flaring. The elbow drifts out to the side instead of staying tucked under the ball. This pulls the shot wide and is one of the hardest habits to break once established.
- Wrist flip without snap. Players push the ball rather than snapping the wrist through the release. The result is a flat shot with no backspin and inconsistent arc.
- Rushing the shot. Players skip the gathering phase and rush into the release. Balance is compromised before the ball even leaves the hand.
- Eyes leaving the rim. Players glance at the defender or look at the ball mid-shot. The eyes should lock on the target before the shot starts and stay there through the follow-through.
- Short follow-through. The wrist does not fully snap, and the hand drops too soon after release. This truncates the arc and affects distance control.
“Even players aware of proper form can break down under fatigue. Focused attention on elbow alignment and follow-through is critical for diagnosing true consistency.”
Use the follow-through hold as your primary diagnostic tool. If a player cannot hold the wrist down and fingers toward the rim after every rep, the release is not complete. A 7-step shooting checklist gives you a structured way to audit each component systematically across your full roster.
Building habits and player confidence
Mechanics without confidence produce hesitant shooters. The two develop together, and your practice structure directly controls which one you are building.
Here is how to design sessions that build both:
- Start with achievable drills. Open each session at a range where the player is already successful. Early makes build the mental pattern that shooting is something they can do.
- Separate form focus from results. During form-based segments, tell players the outcome does not count. They are practicing the motion, not measuring themselves.
- Use visual cues and peer feedback. Pair players for partner shooting so they call out B.E.E.F. cues for each other. Teaching a cue reinforces it faster than just hearing it.
- Rotate drills regularly. Repeating the same drill session after session creates boredom and mental drift. Rotating through shooting routines keeps players engaged and tests mechanics in different contexts.
- Track progress, not just makes. Point out when a player’s elbow alignment improved or their follow-through held longer than last week. Specific mechanical praise is more motivating than generic encouragement.
Repeat practice at high volume matters only after the form is established. Volume before that point just reinforces the wrong pattern.
Pro Tip: End every session on a success. Let players finish with a drill they feel good at. Leaving practice with confidence carries over to the next session and builds the “I’m a shooter” identity that separates players who shoot freely from those who hesitate.
Measuring and verifying shooting form progress
Improvement needs evidence. Tracking the right metrics tells you whether the mechanics are actually changing or whether you are running drills and hoping.
| Metric | What it reveals | When to measure |
|---|---|---|
| Follow-through hold consistency | Release completeness and wrist snap habits | Every practice session |
| Elbow alignment on release | Structural alignment and drift tendencies | Weekly video review |
| Shooting percentage by zone | Mechanical consistency across positions | Bi-weekly spot tracking |
| Form maintenance under fatigue | Whether mechanics survive game conditions | End-of-practice shooting test |
| Performance in catch-and-shoot drills | Footwork and timing integration | After footwork training phase |
Video review is the most underused coaching tool for shooting development. Slow-motion playback at the moment of release shows elbow drift, early wrist drop, and foot positioning errors that are invisible in real time. Record a short form shooting segment weekly and compare across weeks.
Set incremental goals rather than outcome targets. “Hold your follow-through on 9 out of 10 reps this week” is a goal a player can actually control. “Make 80% of your free throws” is not. Mechanical goals build the foundation. Percentage improvement follows. Once form holds up consistently under game-speed conditions, that is your signal to reduce form-focused time and shift toward skill progressions that integrate shooting into live situations. Explore youth coaching progressions to plan that transition effectively.
My honest take on teaching shooting form
I have worked with players ranging from 8-year-olds learning to hold a ball to high school athletes trying to fix mechanics they developed incorrectly for years. The consistent pattern I see is that coaches reach for complexity too fast. New drill, new cue, new feedback before the previous layer is even close to solid.
What actually works is simpler than most coaches want to admit. Slow the progression down. Stay at close range longer than feels necessary. Hold the follow-through on every single rep until it is automatic before adding anything else. That repetition feels boring. Players will push back. Coaches get antsy. But the players who stay in that close-range phase the longest come out with the most reliable mechanics under pressure.
I have also learned that confidence coaching is not separate from mechanics coaching. They are the same work. When a player’s form is shaky, their confidence is shaky. Fix the mechanics in a patient, structured way and the confidence follows without any extra effort. The opposite is never true. Telling a player to “just be more confident” without fixing the underlying mechanics is wasted energy.
The coaches who produce the best shooters are not running the flashiest drills. They are the ones patient enough to stay boring for longer.
— Dejan
Resources to support your shooting practice
Hoopmentality’s coaching resources are built to give coaches the structure to put this framework into practice immediately.
The Big Man Dual Action Drill adds advanced positional shooting and footwork work for players ready to take their mechanics into game-specific scenarios. For coaches who want a full-season structure around skill development, the Game Preparation Guide includes a weekly practice plan that integrates shooting progressions with team preparation. Both resources are designed to save you planning time and keep sessions focused. Browse the full Hoopmentality shooting drills collection for drill options that fit every stage of the progression covered in this article.
FAQ
What is the best way to teach shooting form to beginners?
Start with one-hand form shooting at 2 to 3 feet from the basket using the B.E.E.F. model. Focus only on elbow tuck and wrist snap before adding the guide hand or any distance.
How do you correct a player who keeps flaring their elbow?
Have the player hold the elbow under the ball at the starting position and pause there before every rep. Video feedback from a side angle helps players see the drift they cannot feel during the motion.
When should a player add distance to their shooting drills?
Add distance only when mechanics hold up consistently at the current range. Pushing range before the form is solid creates compensation habits that are harder to fix later.
How many shooting reps should a player take per session?
Quality matters more than quantity. Short, focused sessions of 10 to 15 reps per drill produce faster improvement than high-volume grinding where fatigue causes form to break down.
How do you know if a player’s shooting form is actually improving?
Track follow-through hold consistency, elbow alignment on video, and shooting percentages from marked spots week over week. Mechanical improvement shows up in those metrics before scoring averages change.