

TL;DR:
- Effective zone defense teaching uses a five-step drill progression, emphasizing positioning, rotations, and communication before live game situations. Coaches should focus on mastering each stage at walking pace, instilling proper habits through explicit drills and consistent feedback. Measuring success involves tracking key defensive metrics and refining drills to eliminate common errors.
Zone defense teaching methods are structured coaching systems that build player positioning, rotation skills, and communication through progressive drills. The most effective approach sequences five distinct drill stages, from static walk-throughs to live scrimmages, ensuring players master each layer before adding complexity. Coaches who follow this progression, as outlined in resources from Veo and Hoopmentality, consistently develop more reliable defensive units than those who jump straight to game-speed work. This article breaks down every stage, from core zone defense principles to measuring results on the court.
What are the best drills to teach zone defense?
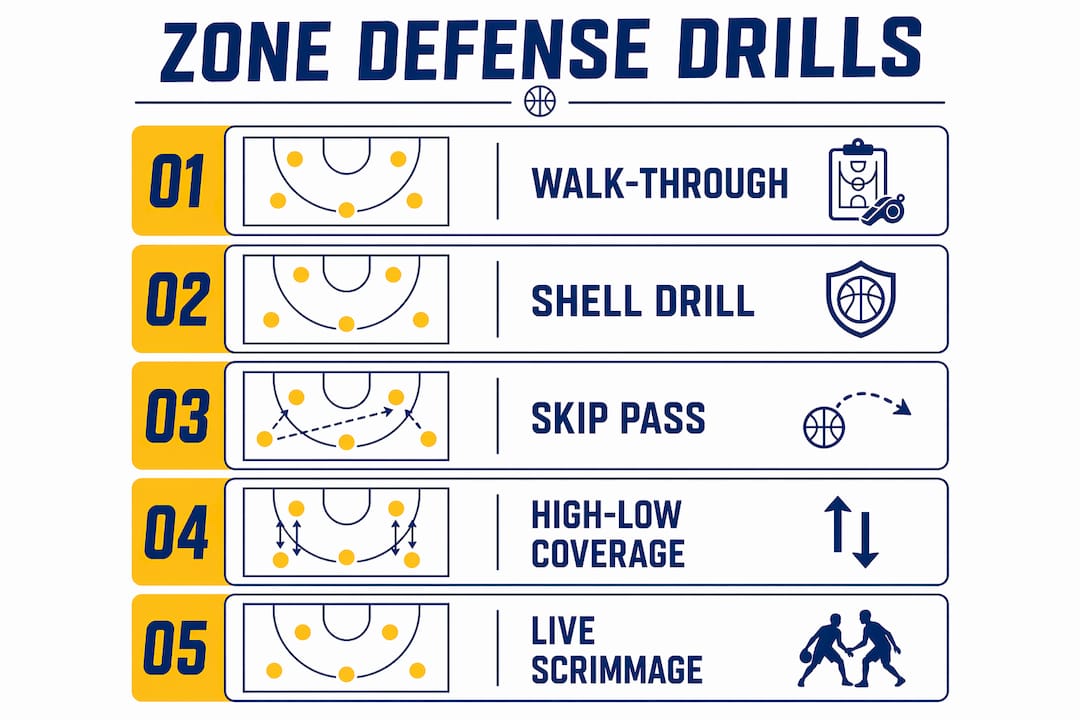
Effective zone defense teaching uses a five-step progressive drill sequence that starts with a positioning walk-through and concludes with live scrimmages. Each step builds on the last. Skipping ahead before players have mastered rotations is the single fastest way to create confusion on game day.
Here is the full sequence, with recommended durations and age suitability:
| Drill | Focus Area | Age Group | Duration |
|---|---|---|---|
| Positioning Walk-Through | Formation shape, spacing | U10+ | 10 min |
| Shell Drill | Rotations, footwork, no opposition | U10+ | 12–15 min |
| Skip Pass Recovery | Ball-side to weak-side rotation | U12+ | 10–12 min |
| High-Low Post Coverage | Interior positioning, help defense | U12+ | 10–12 min |
| Live Scrimmage | Full zone execution under pressure | U14+ | 15 min |
Positioning Walk-Through is where every session should start. Players walk through their assigned spots in the zone formation, no ball movement, no defense. The goal is spatial awareness. Coaches call out positions and players adjust. This removes guesswork before any live reps happen.
Shell drills are foundational to zone defense development. Shell drills focus on rotations and positioning without live opposition, emphasizing footwork and communication. They prepare teams to handle ball movement before any offensive pressure is applied. Run this drill at half speed before moving to game pace.
Skip pass recovery trains the hardest rotation in any zone: the weak-side collapse when the ball swings quickly from one corner to the other. Players who have not drilled this specific movement will always be a step late. Run it with a passer only, no drivers, until the rotation is automatic.
High-low post coverage addresses the most exploited gap in youth zone defense. Two offensive players position at the high post and low block. Defenders must communicate and decide who covers each threat. This drill exposes gaps in your zone before a real opponent does.
Live scrimmage is the final gate. Gradual complexity, starting with formation understanding and progressing to live scrimmages, produces the best learning outcomes. Steady skill layering reduces overload and improves tactical awareness. Only introduce live opposition once rotations are consistent at walking pace.
Pro Tip: Run every new drill at walking pace for at least two full repetitions before adding any speed or opposition. Veo’s youth coaching guidance confirms that reps at walking pace are the key to mastering rotation timing.
How do you implement zone defense principles and communication?
Zone defense principles require players to maintain proper spacing, position between the ball and basket, communicate vocally, and rotate crisply as the ball moves. These are not optional habits. They are the mechanical requirements for any zone to function.
The four non-negotiable principles are:
- Ball-to-basket positioning. Every defender must stay between their assigned area and the basket. Drifting toward the ball creates open gaps behind you.
- Spacing discipline. The zone shape must stay intact as the ball moves. One player collapsing too far pulls the entire structure out of alignment.
- Crisp rotations. When the ball moves, every player shifts simultaneously. A half-second delay by one defender opens a clean look for the offense.
- Constant communication. Verbal calls like “ball,” “skip,” and “post” tell teammates where threats are moving. Non-verbal cues such as hand signals and eye contact reinforce those calls in loud gym environments.
Clear, simple communication from coaches and players is the deciding factor in zone defense execution. Repeated practice of communication drills reduces confusion and improves on-court coordination. The fix is simple: make talking on defense a non-negotiable habit from day one of practice.
Coaches should establish a short vocabulary of calls and drill them until they are automatic. “Ball” means the defender nearest the ball-handler applies pressure. “Skip” alerts the weak side that a long pass is coming. “Post” signals that an offensive player has entered the paint. Keep the vocabulary to six or fewer terms so players can recall them under pressure.
Pro Tip: Write your communication vocabulary on a whiteboard before every practice. Players who see the terms before they hear them in a drill retain them faster.
Positioning also adapts as the ball moves. When the ball is at the top of the key, the zone compresses toward the paint. When it moves to the corner, the nearest defender closes out hard while the rest of the zone shifts toward that side. Teaching zone coverage means drilling these adjustments until they are instinctive, not reactive.
What mistakes do coaches make when teaching zone defense?
The most common mistake in teaching zone defense is adding live opposition before players have mastered rotation patterns. Adding live opposition prematurely before players master rotations is a documented teaching error that hinders learning. A progressive approach that ensures consistent rotations at walking pace before introducing opposition produces better zone execution.
Other frequent errors include:
- Skipping communication practice. Coaches often assume players will talk naturally. They do not. Communication must be drilled explicitly, with coaches stopping play to correct silence just as they would correct a missed rotation.
- Ignoring spatial awareness. Players who do not understand the geometry of their zone will freelance toward the ball. This leaves the weak side open every time. Use floor tape or cones to mark zone boundaries during early drills.
- Rushing to complex formations. A 2-3 zone is the right starting point for most youth teams. Introducing a 1-3-1 or 3-2 before players understand basic rotation principles creates confusion without tactical benefit.
- Inconsistent check-ins during drills. Coaches who let drills run without stopping to correct errors allow bad habits to calcify. Stop play, correct the specific error, and repeat the rep immediately.
Monitoring common coaching mistakes, such as rushing complexity or failing to emphasize communication, directly improves the success rate of zone defense teaching. Hoopmentality’s coaching resources identify these high-impact errors and provide concrete corrections for each one.
The underlying principle is patience. Zone defense is a system. Systems require every player to understand their role before the whole unit can function. Coaches who rush that process get a zone that looks like a zone but plays like a scramble.
How do you measure the effectiveness of your zone defense?
Measuring zone defense effectiveness requires tracking specific defensive metrics across practices and games. Tracking defensive rebounds, forced turnovers, opponent shooting percentage, and analyzing game footage allows coaches to identify areas needing improvement and refine defensive strategies. Without these numbers, you are coaching on feel rather than fact.
Here is a practical four-step evaluation process:
- Track defensive rebounds per game. A well-executed zone boxes out and controls the glass. A declining rebound rate signals that players are not locating their box-out assignments after rotations.
- Count forced turnovers. Zone defense should generate deflections and steals through active hands in passing lanes. Track these weekly to see whether your players are reading passing angles correctly.
- Record opponent field goal percentage. Compare opponent shooting percentages from inside and outside the arc. A zone that gives up too many paint points has a rotation or spacing problem. A zone that gives up too many threes has a closeout problem.
- Review game footage weekly. Video review is the fastest feedback loop available. Show players specific clips of correct and incorrect rotations. Players who see their own errors correct them faster than players who only hear about them.
Pair these metrics with direct player feedback. Ask players which rotations feel unclear and which communication calls they are missing in real time. That feedback loop improves both execution and buy-in. Players who understand why a rotation matters are far more likely to execute it correctly under pressure.
Key takeaways
The most effective zone defense teaching method is a five-step progressive drill sequence that builds positioning, rotation, and communication before any live opposition is introduced.
| Point | Details |
|---|---|
| Use progressive drill sequencing | Start with walk-throughs and shell drills before advancing to live scrimmage. |
| Drill communication explicitly | Establish a short vocabulary of calls and practice them every session. |
| Avoid premature opposition | Introduce live defenders only after rotations are consistent at walking pace. |
| Track defensive metrics | Monitor rebounds, turnovers, and opponent shooting percentage to measure progress. |
| Stop and correct in real time | Pause drills immediately when errors occur to prevent bad habits from forming. |
What i have learned coaching zone defense
The biggest mistake I see coaches make is treating zone defense as a shortcut. Coaches often install a 2-3 zone because they think it requires less individual skill than man-to-man. It does not. A zone requires more collective discipline, not less.
The rotation patterns in a zone are unforgiving. One player out of position exposes the entire structure. That is why I always start with the shell drill at walking pace, no exceptions, regardless of the age or experience level of the group. Players who feel the correct rotation in their feet before they run it at speed execute it far more reliably in games.
I also think most coaches underestimate how much communication work a zone requires. Man-to-man defense has built-in accountability because each player has a specific person to guard. Zone defense is positional, which means players must constantly talk to maintain awareness of threats. I have seen well-drilled youth teams run a zone more effectively than older teams simply because their coaches built communication habits from day one.
The evaluation piece is where most coaches leave points on the table. Watching film and tracking opponent shooting percentages by zone area tells you exactly where your defense is leaking. That data removes the guesswork and makes your next practice session far more targeted. Use the player development methods that connect drill work directly to in-game metrics.
— Dejan
Build your zone defense system with Hoopmentality
Hoopmentality has the resources to put this framework into practice immediately.

The Big Man Dual Action Drill is built specifically for post players in zone defensive roles, training the high-low coverage and rotation reads that most drills ignore. For coaches who want a full-season structure, the weekly practice plan integrates zone defense drills into a complete game preparation system. Both resources are built from real coaching experience and designed to save you time while giving your players a clear, repeatable system to execute.
FAQ
What is the first step in teaching zone defense?
The first step is a positioning walk-through with no ball movement or opposition. Players learn their assigned spots in the formation before any rotations or live pressure are introduced.
How long should zone defense drills last per session?
Individual zone drills should run 10–15 minutes each. A full progressive session covering walk-through, shell drill, and one specialty drill fits within a 45-minute practice block.
When should youth players start live zone defense scrimmages?
Live scrimmages are appropriate for players aged 14 and older, and only after rotations are consistent at walking pace. Introducing live opposition too early is the most common mistake in youth zone defense teaching.
What communication calls are most important in zone defense?
The three highest-priority calls are “ball,” “skip,” and “post.” These three terms cover the most common offensive threats and give players a shared language to coordinate rotations in real time.
How do you know if your zone defense is working?
Track opponent field goal percentage, defensive rebounds, and forced turnovers across multiple games. Declining opponent shooting percentages inside the arc and increasing rebound totals are the clearest signs that your zone rotations are executing correctly.